THIS RECIPE IS GLUTEN-FREE & PALEO.
Crusty Artisan Bread (Gluten-Free & Paleo)
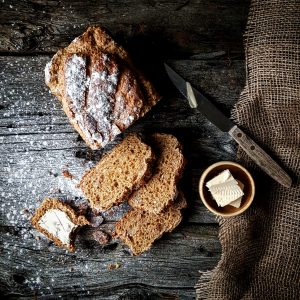
Ok wait, so what you’re saying is, there is such a thing as crusty, paleo bread? Like, crunchy on the outside, and airy on the inside? Yepper, right here my friends, right here.
That’s the conversation I had with myself after developing and recipe testing this bread.
See, my Dad is a bread baker. And not the kind with a machine. On any given day you can go to his house, and the smell of sourdough rising on the heated surface of his fridge top will hit you like a tonne of mouthwatering, salivating bricks.
Since cutting out wheat from my diet in 2013, the taste of that family tradition is now only a memory…until today!
I will break bread again!
Join me in a bread breaking party, and give this recipe a try.
As always, I’d love you to leave me your recipe feedback below.
The paleo bread ingredients I use include:
warm water
fancy molasses
quick-rise instant yeast
tapioca flour
almond flour
olive oil or avocado oil
egg
salt
What I used to make this recipe:
Crusty Artisan Bread (Gluten-Free & Paleo)

THIS RECIPE IS GLUTEN-FREE & PALEO.
- 1/2 cup warm water
- 1 tbsp fancy molasses
- 1.5 tsp quick-rise instant yeast
- 2 cups tapioca flour (+ 2 tsp for top)
- 1 cups almond flour
- 1 tbsp oil (olive or avocado)
- 1 egg
- 1/2 tsp salt
-
PROOF THE YEAST: To ensure your yeast is active and will do it's job in this recipe, you'll first need to "proof" it. Mix tap-warm water (typically about 100 F), yeast and molasses together in a glass liquid measuring cup. Let sit for 15 minutes. If your yeast is active, a foam should grow and rise just above the rim of the glass measuring cup. (If it does not grow at all, your yeast is dead, and you will need to start again with new yeast. This measure is taken prior to adding flour, so you do not waste all of your flour in a recipe that will not work).
-
Pre-heat oven to 350 F.
-
PREP THE DOUGH: In a large mixing bowl, add all other ingredients. Add active yeast mixture, including foam. Using a spatula, fold all ingredients together, until well combined. It will be quite sticky, and may take a little more time to combine than you think!
-
Line a 8.5" x 4.5" loaf pan with parchment paper.
-
Pour dough into loaf. Sift a very light layer of tapioca flour on top of the loaf. Using a knife, slice a few diagonal slits in the top of the loaf.
-
BAKE THE BREAD: Place loaf pan on the middle oven rack and bake for 55-60 minutes, or until lightly browned on top. Remove from oven, let cool in the pan for 10 minutes. Remove loaf from the pan, place on a cooling rack and let cool for an additional 20 minutes.
-
EAT THE BREAD! For best results and the softest centre, enjoy while still fresh out of the oven (after the 30 minutes of cooling). This bread is great as is, toasted or warmed. Bread stores well in a resealable plastic bag for up to 3 days in the fridge.
Need more gluten-free & paleo recipe inspiration?
Check out these drool-worthy recipes featured in the Meat & Seafood Edition of my Paleo E-Cookbook Series.
I promise, you’ll love it!
CLICK HERE TO READ MORE
Whether you’re an avid crossfit enthusiast needing to rebuild your taxed muscles, a muddy mountain biker looking to refuel after a big day of adventure, or an all-around healthy, active, human looking for some variety in your meals, this Paleo E-Cookbook is for you!
BUY IT NOW!


THIS is the best GF bread I’ve had!! It’s exactly as it sounds – crusty outside and squishy inside! It tastes best when still warm, with a bit of delicious dairy free butter.
I’ve tried this recipe twice now, the first time didn’t turn out very well, it was a bit raw inside…the second time it turned out as described above, but I was too eager and couldn’t wait to try it, so I cut into it as soon as it came out of the oven. I baked mine at 375 for 45min.
YUM! I will be making this again…(although it doesn’t tend to last very long in my house!)
Thanks!!! Keep up your awesome inventions!
Thanks for the feedback Ang! Glad it was a hit!